Showing posts with label game art. Show all posts

14 December 2014

Raining Doom Upon Our Doomed Enemies!

It's been a while, but with me spending my work days in Presagis Creator I hardly feel like working in low poly 3d in Maya when I come home. So between working on the car, house chores, and simply trying to relax, I've been sneaking a few hours here and there on sunday mornings having fun with my rocket punk themed game I've been dreaming about for some time.

Since the point of a new post is to show new work, I present to you Remote Rocket .. or RC Rocket .. still not sure.


The point of the rocket is to be much larger than the others and to only be able to carry one at a time, once fired the players camera will ideally follow the rocket as the player will be able to control the rocket to remotely rain down some doom upon his doomed enemies. Once fired the wings and extra thruster will extend from the main housing allowing for extra control and distance while still keeping a large area of the main housing for explosives. The metal loops on the top are where the rocket would be held under the vehicle just before it was launched .. I want this item to be so big other players can see it and try to attack the player before it can be launched.

The next weapon will be a little more electrically themed, the concepts are pretty much nailed down I just have to start blocking it out and seeing how it turns out in the 3d space. But I'm sure it'll be next year before I post that one.

[edit] - I found some time to start blocking out the concept based on my drawings and some random google searches. The body will be similar to the fire/lava rocket in that it's mostly glass, but this one will have a gold/brass colored metal braces along the sides to add some support and rocket punk style. The hardest part I think will be getting the look of the plasma ball in the middle, but that's how you learn right? :)


As always: thanks for looking in on me, and do stay tuned!

26 February 2014

When the Fat Man Sings

I had a bit of extra time due to my work schedule and filling in for people, and I realized I had never updated my finished power rocket. So here it is:


I modeled and textured the Mark 3 "Fat Man" bomb after photos I'd found online, and then exaggerated it to fit in with the theme of the rocket booster on the bottom. This "heavy" rocket will be the slow non-maneuverable, but extremely power one hit wonder of any pilot's arsenal.

Here's a preview of what I'm currently working on:


I've turned in a large chunk of textures/uv'ed models for my internship, so I'm awaiting further review before moving on to the next area .. and got busy with something else that doesn't make any sense.


28 October 2013

Lava Lamp

I've been working on a fire type of rocket, and based on my concepts the lava lamp style rocket was the most popular - so that's what I rolled with.


The concept I had drawn, had small tubes filled with lava or something glowy, so the lava lamp wasn't too far fetched from that idea. It was much more expensive, but much more interesting.

Next item will be a slow moving power-type rocket!

14 August 2013

Do You ... Rocketpunk?

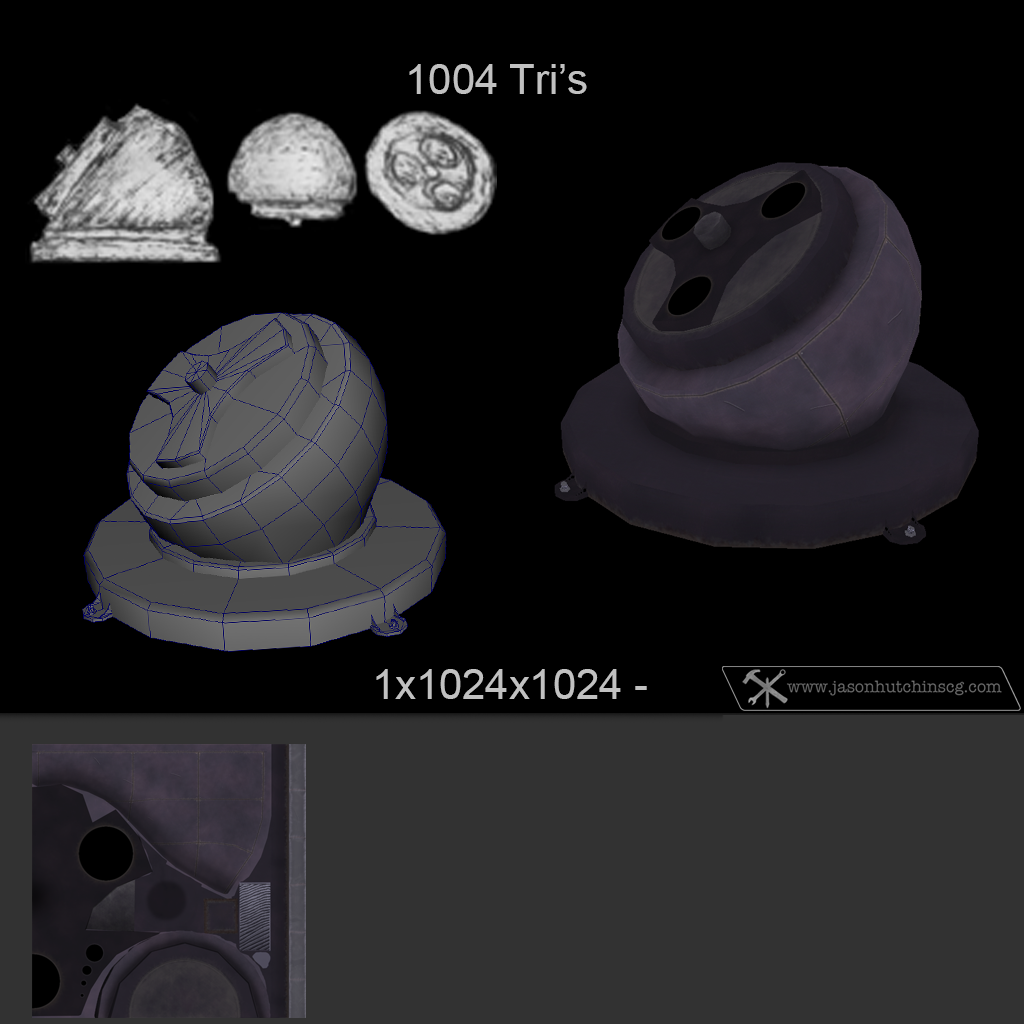
This month was filled with concepting and building the red team's rocket turret, to clarify I don't have a lot of time outside of my day job, but what I do spend is my afternoons after work. This is what I came up with:


I started with my sketch that I had done while at my day job, and then I would come home and block it out in maya and began to play with texture patterns that might look good for that shape and theme.

The red team is going to be the "low tech" team, so I wanted this to feel like re-purposed technology muscled together for something new. In this case: the rocket turret! So the cog will turn as powered by the boxes on either side of it, when it stops with a rocket facing upwards in the holster the rocket will fire to defend the base. So the metal plates are old and rusty, and have all been riveted together simply to .. work.

Just last night, while looking up reference, I noticed the genre my game objects seem to be finding themselves is rocketpunk. Who knew? Moving forward I'll be taking advantage of this.

Next I'll start on the rockets I've been concepting, stay tuned and I'll keep you posted!

15 July 2013

Self Defense


Finally was able to make a large turn-in for my internship, and though I've been working extra hours at my day job I've managed to find time to return to my "weekend project". Here's my current status of the texture on the previously created geometry and uv's.


In keeping with the blue team's theme of sleek and modern/futuristic tech, this rocket turret can quickly fire rockets to defend the blue team's bases from red team's attacks. There's a small power cable in the back not captured in this render. I feel that the poly count isn't too bad for a rounded object, and the lower cost of the blue team's vehicles might make up for the higher cost of their equipment.
Next I'll start on the low tech turret.


Stay tuned and I'll keep you posted!

31 December 2012

Surviving the Apocolypse ...

It's been a busy month of apartment hunting and building stuff in maya, but not so much for my internship. A little problem came up where I was informed I had been working in the wrong scene this whole time ... I guess that was something that should have come up when I asked what file I should be working in and I was told to use that one. Oops? So while waiting to be told what to do about all of that, I worked on a little something for the game ... but before I could complete it I was started back up on the movie project. So here's what I have so far:


It might not make much sense without seeing it in context to what it is or how big it is .. or what it's made of ... you'll see more of it when I get another pause from the film project. :)

No new public news from the film project, but it's always exciting to see things coming together and coming to life piece by piece .. or frame by frame ... and I can only hope some of the behind the scenes stuff will eventually see the light of day.

Stay tuned and I'll keep you posted!

31 July 2012

Shields Online!

For this month I spent a lot of hours for AlliedBarton, and then several hours for Minecraft Tekkit and Arma DayZ. I mostly wasted time this month because of the amount of time it's been since graduation and the amount of success I've had with my career application process [316 applications sent and counting]. But you aren't here to read about that! Let's get to the interesting stuff!

I've wanted to remodel a high poly mechanical object for a while, and I ended up deciding to do some sketches while at work for the shield I designed for Fender Bender. Here's a blockout I made with the original to the left of it.


Once I did that I moved on to uv's and making tweaks to everything. Here's where I am right now with the texture, and below that I've got the diffuse texture itself to show you the uv layout.


The next thing I want to focus on for this diffuse is the dual screens and the center circle power button thingy. We'll see how things go with my day job and figuring out my new work responsibilities at the site I've been assigned to. I didn't get anything done for the DBZ - HFIL environment this month, I think everyone lost interest in seeing it be completed or whatever. Life goes on ....

31 May 2012

HFIL - Texture Time 2

This month went by quickly with the flurry of work at different security sites and game art taking up my free time. Career status is still on hold, but I managed to get a couple of [negative]replies .. so at least someone out there is seeing my applications. As of today, I have 296 applications out since graduation last year. On a side note I saved up and spent my entire 2 weeks' pay check on Photoshop CS6 pro-license so I'm having fun trying to learn the new stuff in it.[and I can finally try to sell some stuff on turbosquid] Enough of all that, on to the work!

To start where I left off last month, here's the light post:


Then I made a repeating concrete texture for the fountain, using the colors I had used while making the base pillar for the lamp post. In hindsight it might have been better to just use this material for the base pole as well, but I guess that's what happens when you can't just sit down and focus on your environments as a whole. :)

The water texture was something I wasn't sure how to tackle, but since the ESF crew seemed determined to make it look as real as possible with hand painted textures I knew this had to be my goal. I ended up finding an old tutorial from another blogspot user: James. Though because of the age of the tutorial I've noticed some of the images/info seems to be missing. Below this image I'll outline the steps used just in case his tutorial dies.

Step 1: Create a blank canvas, I used 512x512px
Step 2: Choose your highlight and shadow colors as your 2 colors for your brush pallet.
Step 3: goto: filter - render - clouds
Step 4: goto: filter - distort - ripple [setting: 999, large]
Step 5: goto: filter - distort - ripple [setting: 999, medium]
Step 6: paint out your alpha channel as necessary for realism.
Some tips that helped me was to use as big a cloud as possible when using the cloud filter, and for the bloody water I used a dark red and a white/almost red color.


The metal was pretty simple, I wanted it to be black paint with a lot of simple scratches that would be highly repeatable. So I went with a smaller texture and went through lightly applying some of my grunge brushes. I think it turned out pretty decent.

I needed a repeatable wood texture for the benches and the park sign, so I used a technique I picked up while at full sail. I used the fibers filter [filter - render - fibers. settings: 16, 4], and some bevel/emboss while tracing the fibers at a low opacity and a dark brush. Going back to add some cracks in the wood and then playing with the highlights go a long way.

Then I took that texture and added some basic text for the park signage, I ended up liking the way the "bulkyRefuse Type" turned out, though I tried to add some small cracks and a slight bevel/emboss to the letters.

Here's how they turned out in the scene in maya, later on I worked on making normal and specular maps using photoshop and crazybump, and then moving all my files over to 3ds max so that I could work alongside the methods of the ESF crew.


Lastly I came up with a theme for the sky dome, but after I finished it and showed it off to the ESF crew they promptly informed me of the dynamic sky technology they have for their game engine .. and that my texture wasn't necessary. So .. oh well .. here it is anyways :p


I was able to play with the slate material editor in max as well as trying to figure out how max handles two materials on the same mesh. Not a big fan of the extra steps, but in the end I was able to get the same results maya gave me. I'm really glad this is all coming together as I have a few "weekend" personal projects just begging for me to get to them. Speaking of work though .. I need to head to my "day job".
Stay tuned!

30 April 2012

HFIL - Texture Time 1

This month was mainly a UV and texture month, so here is where I was able to get.

First I started with some grass brushes I have collected over the course of my Full Sail studies, I'd love to give credit where credit is due, but I honestly don't know where I got which brushes as they're all mixed into these grass card textures. Texture size: 256x256

Then came the part I was unsure about, how do I make the ground look like it's covered in grass? After digging around I found several references to popular MMO's that had used this style .. we'll see if I did it right once I get this and the cards working together. Texture size: 512x512
   

Dirt is easy right? I mean it's everywhere! Once again I looked up some online game references to see what they used that works, and this is my attempt at their mastered techniques. Texture size: 512x512
  

 Attempting to cover those giant rock walls with a repeating texture was my quest, and this was my answer to that, I'm also using this as the smaller stone/boulder texture. Texture size 512x512

The stone tree-things always depicted in the far distance, they showed more of a smooth stone with hard edges .. this is what I envisioned they might look like up close. Texture size 512x512
  

Stepping away from the fully repeating textures, I began working on the light poles which needed some small details to identify the materials. It's just a WIP, but I feel the need to show where I am at the end of the month. Texture size 512x512

 Then, just so you're not completely confused by wth I'm talking about, here's a quick screen grab in the default render view of maya .. nothing fancy yet. :)

Stay tuned, and I'll keep you posted.