Showing posts with label fender bender. Show all posts

13 April 2014

Chainsaw Rocket!

This past month has been another light month on my internship, I've touched up a few things and did file maintenance on the server, so I took full advantage of my nights as well as the extra hours I've had to work at my day job filling in for my personnel taking vacation time off during nights and weekends and I'm stuck covering it. I present to you my version of the chainsaw rocket:


I seem to have a love affair with using Stihl branded tools for reference images, as I also used them for reference during the Fender Bender game "healing item" pickup [duct tape and wrench], so I decided this time to keep the color scheme used on their chainsaws so that it didn't look too extremely unrealistic. I also decided to change the chainsaw teeth to something a little more cartoony/unrealistic to match the overall theme of the game. I decided to leave out the original concept art I had sketched out because of the overall quality of it was much lower than my normal sketches. If anything comes up I'll include it separately, but for now I'd rather simply leave it off the blog page.

Thanks for staying tuned and I'll update you when I finish the next piece!

26 February 2014

When the Fat Man Sings

I had a bit of extra time due to my work schedule and filling in for people, and I realized I had never updated my finished power rocket. So here it is:


I modeled and textured the Mark 3 "Fat Man" bomb after photos I'd found online, and then exaggerated it to fit in with the theme of the rocket booster on the bottom. This "heavy" rocket will be the slow non-maneuverable, but extremely power one hit wonder of any pilot's arsenal.

Here's a preview of what I'm currently working on:


I've turned in a large chunk of textures/uv'ed models for my internship, so I'm awaiting further review before moving on to the next area .. and got busy with something else that doesn't make any sense.


14 August 2013

Do You ... Rocketpunk?

This month was filled with concepting and building the red team's rocket turret, to clarify I don't have a lot of time outside of my day job, but what I do spend is my afternoons after work. This is what I came up with:


I started with my sketch that I had done while at my day job, and then I would come home and block it out in maya and began to play with texture patterns that might look good for that shape and theme.

The red team is going to be the "low tech" team, so I wanted this to feel like re-purposed technology muscled together for something new. In this case: the rocket turret! So the cog will turn as powered by the boxes on either side of it, when it stops with a rocket facing upwards in the holster the rocket will fire to defend the base. So the metal plates are old and rusty, and have all been riveted together simply to .. work.

Just last night, while looking up reference, I noticed the genre my game objects seem to be finding themselves is rocketpunk. Who knew? Moving forward I'll be taking advantage of this.

Next I'll start on the rockets I've been concepting, stay tuned and I'll keep you posted!

15 July 2013

Self Defense


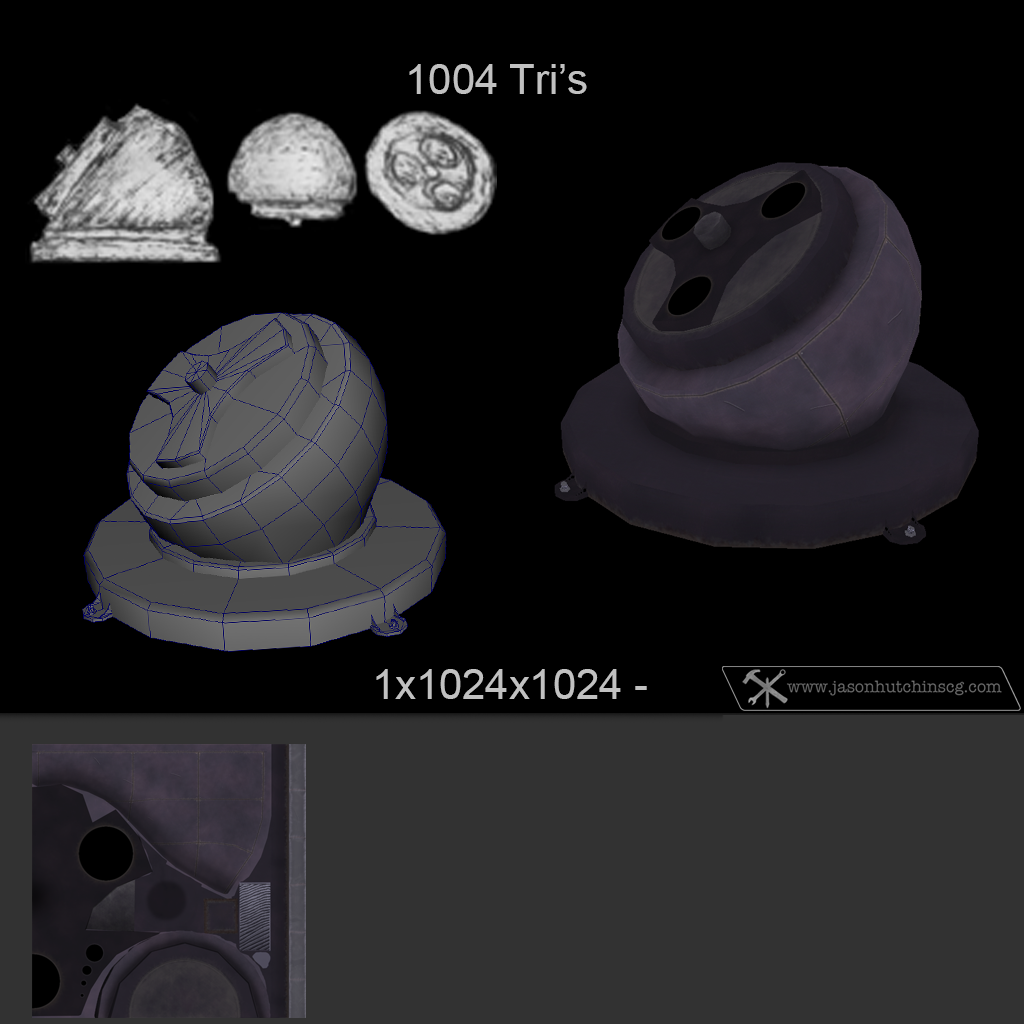
Finally was able to make a large turn-in for my internship, and though I've been working extra hours at my day job I've managed to find time to return to my "weekend project". Here's my current status of the texture on the previously created geometry and uv's.


In keeping with the blue team's theme of sleek and modern/futuristic tech, this rocket turret can quickly fire rockets to defend the blue team's bases from red team's attacks. There's a small power cable in the back not captured in this render. I feel that the poly count isn't too bad for a rounded object, and the lower cost of the blue team's vehicles might make up for the higher cost of their equipment.
Next I'll start on the low tech turret.


Stay tuned and I'll keep you posted!

31 December 2012

Surviving the Apocolypse ...

It's been a busy month of apartment hunting and building stuff in maya, but not so much for my internship. A little problem came up where I was informed I had been working in the wrong scene this whole time ... I guess that was something that should have come up when I asked what file I should be working in and I was told to use that one. Oops? So while waiting to be told what to do about all of that, I worked on a little something for the game ... but before I could complete it I was started back up on the movie project. So here's what I have so far:


It might not make much sense without seeing it in context to what it is or how big it is .. or what it's made of ... you'll see more of it when I get another pause from the film project. :)

No new public news from the film project, but it's always exciting to see things coming together and coming to life piece by piece .. or frame by frame ... and I can only hope some of the behind the scenes stuff will eventually see the light of day.

Stay tuned and I'll keep you posted!

31 August 2012

HFIL textures and FB shield updates

As I settled into my site supervisor position for the security company I work for, a pattern of time began to emerge that I was able to use to get some real work done ... well .. at least when I wasn't sleeping at the keyboard again. :)

HFIL - terrain:
After finally having a teamspeak chat with one of the members, I was able to use their 3ds max blender material that allowed me to paint out the terrain textures in an rgb format. This is how it turned out.
All my textures on a single blendmap for the terrain.


It turned out I'll need to make some more terrain textures to make everyone happy, I guess they had assumed I had made more. So I set off to make at least one more dirt and grass texture. It was also brought to my attention that the blood in the bloody pond wasn't bloody water as I had assumed, so I got rid of the alpha channel I was using.


I started the dirt texture with the two dirt colors I had set up with the previous dirt texture, and I used a noise filter. Then I used the oil paint filter and played with the until it started to look remotely like rough dirt or something ... vaguely. Then I made another layer with the noise filter again, this time with black and white, and used a crystalize filter to give myself some smaller chunky bits to help break up the oil painting pattern. I set the crystalized layer over the oil painting layer and this is how it turned out! Later I offset it so that it would repeat nicely.


I created a new grass blades texture for the cards I had in my grass baking maya scene, I made it a bit lighter around the edges than the other two blade textures. Once it rendered out [about 4 hours] this is how it turned out. I haven't yet offset it for repeating, so if you're taking my textures for your own personal use be advised that this one isn't repeatable yet! :) I'm also not sure if I'm happy with how bright it turned out, we'll see how it works blended next to the other two grass textures.


FB - shield:
I started getting impatient to get back to working on my shield update I posted for last month, so while the car was in the shop I sat down in maya and started deleting edges. The model went from a high poly count of 19626 to a low poly count of 3733 with basically no change in silhouette and minor changes to the textures.


high poly


low poly

Then I noticed that the marmoset toolbag was on sale for $25, and so decided to do the final render in there as I had never used it before .. but I have heard a lot of good things about it. This is my first time using the program, and was able to come up with a pretty nice render.
Low poly mesh render in marmoset toolbag.

It might be a bit before I get to plunge into my own projects again, as I received a request for help on another unlisted project. I accepted the unpaid offer, and unfortunately will be unable to post my work from that project until it's completed and posted by the actual owner of the project. I only hope I can keep up with the demands of the project and maintain the technical level they require for it.
Thanks for staying tuned, and I'll keep you posted.

31 July 2012

Shields Online!

For this month I spent a lot of hours for AlliedBarton, and then several hours for Minecraft Tekkit and Arma DayZ. I mostly wasted time this month because of the amount of time it's been since graduation and the amount of success I've had with my career application process [316 applications sent and counting]. But you aren't here to read about that! Let's get to the interesting stuff!

I've wanted to remodel a high poly mechanical object for a while, and I ended up deciding to do some sketches while at work for the shield I designed for Fender Bender. Here's a blockout I made with the original to the left of it.


Once I did that I moved on to uv's and making tweaks to everything. Here's where I am right now with the texture, and below that I've got the diffuse texture itself to show you the uv layout.


The next thing I want to focus on for this diffuse is the dual screens and the center circle power button thingy. We'll see how things go with my day job and figuring out my new work responsibilities at the site I've been assigned to. I didn't get anything done for the DBZ - HFIL environment this month, I think everyone lost interest in seeing it be completed or whatever. Life goes on ....

01 July 2012

HFIL - Texture Time 3

This month came and went fast, but I managed to find time to really look at some textures as well as add some variety textures for blend mapping in the environment once it makes it to the game engine .. though as I don't have the game engine I don't really know how all of this will look until the group I'm with can get me started in the engine.

First though, let me show you what I did while waiting for critiques. This is a "little" side project I have been working on in my free time. I made one of the vehicles already as posted a few months ago, so this is vehicle two. Don't have official names or anything yet, but I like the look of it.
Here's a quick sample of the new grass and a little area of fallen rocks/blood water for the HFIL environment.
I wasn't happy with the grass, so I looked around and found a new technique .. let's render some grass cards! I simply made some blades of grass as shown below.

 Then I duplicated the cards out across a plane and rendered it at high quality and even lighting, took that to photoshop to make it repeatable and ended up with this:
 Once I had the cards in place, I could replace the grass blades texture and simply re-render and get an entirely different section of grass.
 Then I wanted to break up the dirt texture with some pebble .. rock .. things, so I found a photo of some nice pebbles and made it repeatable. Then I selected by color all the pebbles and masked them out, keeping the dirt stuff in between them. Then I made my own painted rocky pebble texture and that's what you see here:
Moving along with rocks, I wanted to try my hand at another rock texture for the large cliff surface. I'm not happy with how different the colors turned out from the other rock texture, but I think the rough heavy grooves will go good with the other texture.
Still working with rocks, but now back to the grassy areas, I wanted to add some rocks kind of poking out of the grass. So I found a nice photo of some rocks doing exactly that, and used their shapes and then filled it in with my own rocks. The flat color you see is just to help get rid of the white line in the transparency.

In other news, my one year anniversary for graduating from Full Sail University was the 1st of July ... it's been a year and 311 applications and still I can't get anyone to pay any attention to me long enough to hire me. The pay off never came, and now I'm stuck footing the bill on a paycheck that isn't adequate to pay it. Fun times ....
Stay tuned and I'll consider not giving up completely.