Showing posts with label metal. Show all posts

12 September 2015

A Quick Update on Slow Progress

I've spent the last few weekends mixing together more ancient aircraft to make combat vehicles for my teams, this time the red team will have pieced together the main body and wings of a WW1 German AEG G4, and the jet engines of a WW2 German Horten Ho 229. Looking back I tend to use a lot of older German designs to influence my own and I think it's just because they were really good at building interesting shapes and really pushing the design limits to get new properties in their planes.
With all that said, here's a silhouette test I threw together:


I so far have UV'ed the checkers texture onto the plane and then duplicated the body pieces over, but I think I'm ready to start rocking a rusty red paint job on there for the low tech's to head into battle.

Stay tuned and I'll have that up before too long.

19 July 2015

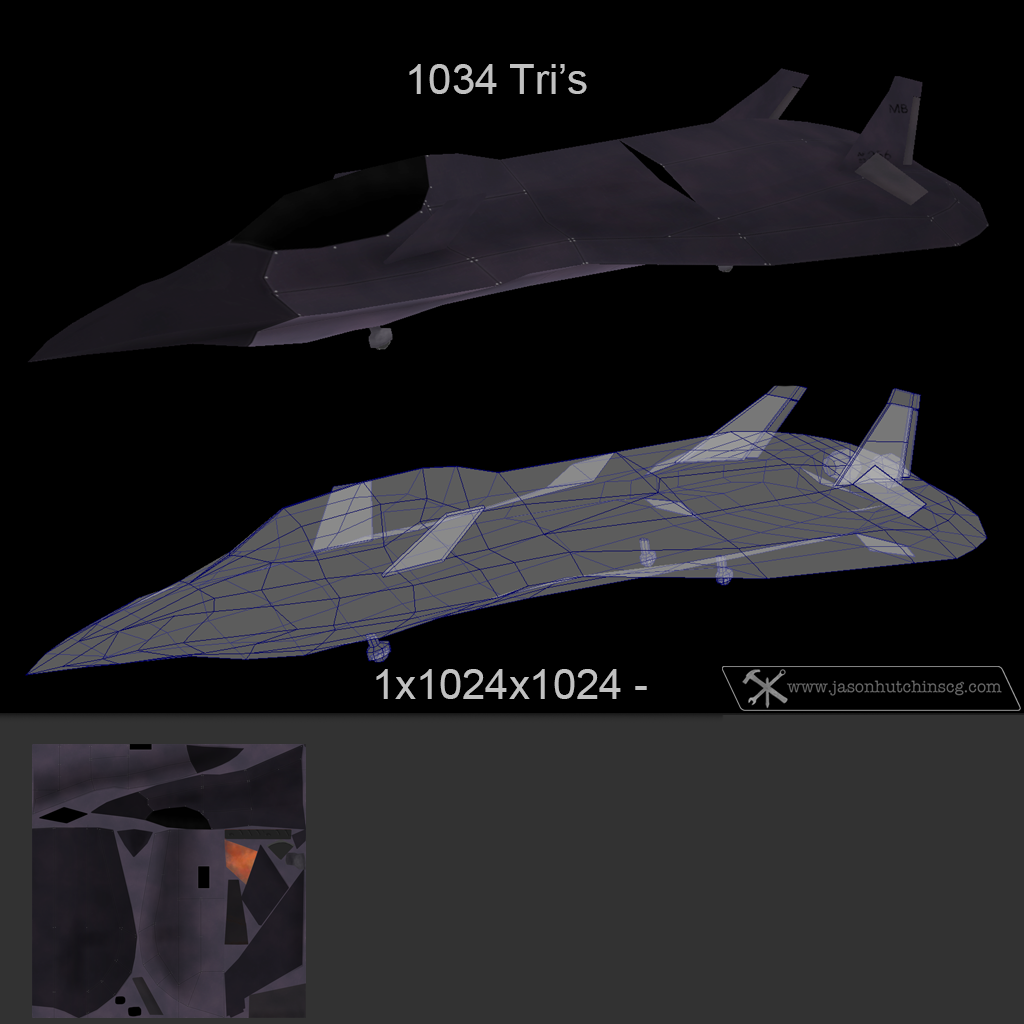
High Tech Medium Plane


You may have noticed I skipped a bit of time again, this time my excuse is that I was building a sculpey maquette. I may or may not show that on this blog at some point, so for now just be happy with a new update from the game project!

I managed to build the High Tech team's medium rocket:


There's the traditional model/texture view you've grown accustomed to from my blog, but here is a viewer from Sketchfab for the 3D render view.


I realized, before I uploaded this model to Sketchfab, I hadn't ever uploaded the previous vehicles for anyone to view in 3D on Sketchfab. So I took care of that as well as you can see below:


Thanks for viewing, and as always stay tuned for more updates!


05 April 2015

Brain Power

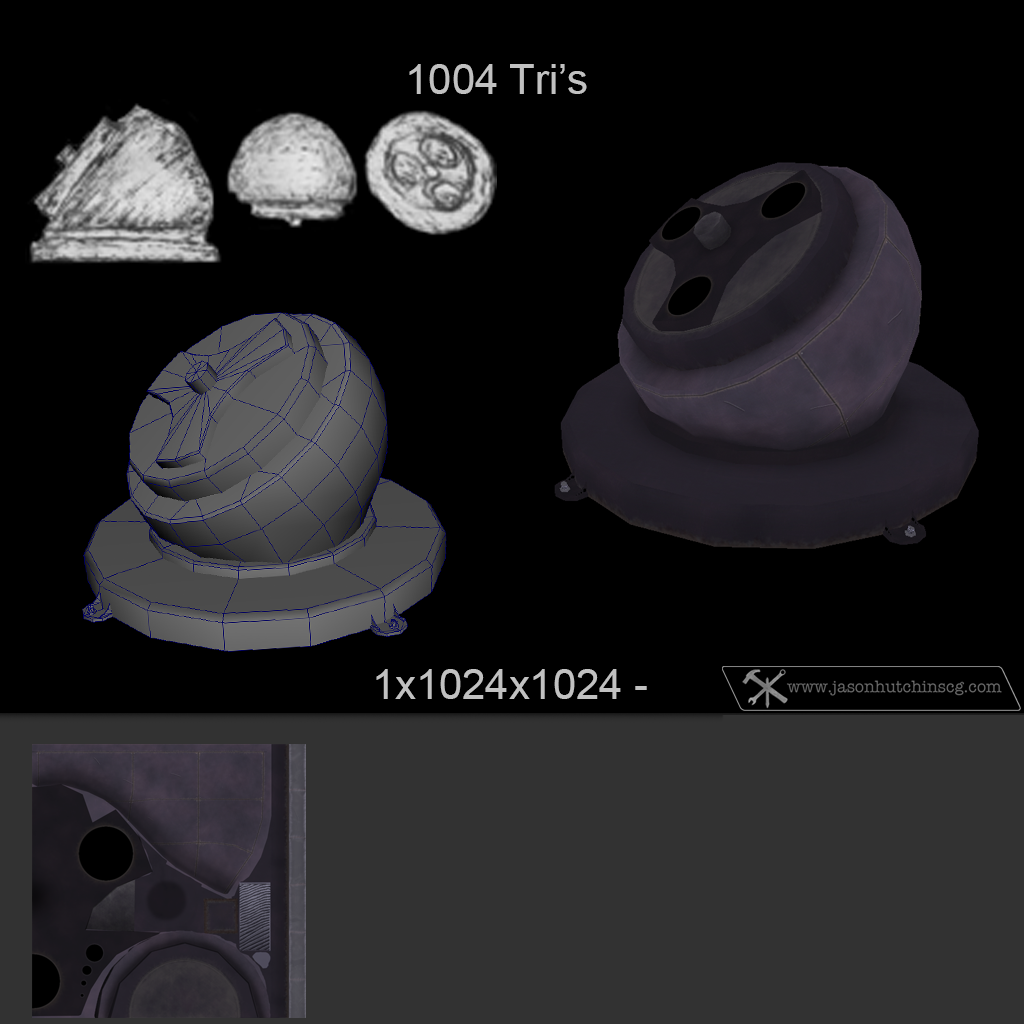
I ended up working this one a couple times, like I mentioned earlier, but I think I finally found the form I wanted. This rocket is half the height of the other rockets, but 10 times as smart .. with brain power of course. That's how it works right? Adding a brain to anything will make it smarter?


    Smart Rocket
    by jason.n.hutchins
    on Sketchfab


Hopefully the new Sketchfab 3d previewer will work out for this blog, but just in case I'm still going to be uploading the old 2d shots of the items.

This should be the last of the rocket weapons, now back to the vehicles! I have a bunch of sketches from the previous years I wasn't able to spend a lot of time on this so I'll still be working through those to see what I can make work. The next items should be the medium fighters for both low and high tech teams.

Stay tuned!

edit [12apr2015]: I started back up on the vehicles, this time on the medium high tech and have included a silhouette test of the block-out below.


22 February 2015

Ricochet Rocket

This one I did a few extra sketches on so the build went rather quickly, the idea is that the rocket will hit the enemy and have a small explosion which will release the two naval mines attached to it to bounce out and explode with whatever it hits. So I guess this weapon would be best used for attacking a stationary target like a base or something.


I added a chalk-like sketch on the side of the mines as decoration, I've seen a lot of people do that in the military. They'll draw on the bombs intended for their enemies with their enemies names on it. So this is a little nod to that environment.

The next rocket is supposed to be the final one for this game, and it should be smarter than the rest of them. Then after that one I can get back to creating the rest of the vehicles to flesh out the "character classes".

Thanks for looking and stay tuned!

01 February 2015

Tesla Rocket

It's a new year, but I'm still working on the same game. For this build I wanted to make a weapon that would electrify the vehicles it impacted, after digging around for a while I decided the coolest way to do that would be a plasma ball that would electrically explode when it hits its targets. So I present the Tesla Rocket:


I really like the silhouette of the rocket and the arched metal around the glass dome, but wasn't too happy with the way the plasma ball cards came out. I guess it'll do though. This should leave two more weapons to build before I can continue to work on vehicles and environments again.


Thanks for looking at my work, and stay tuned for more updates. :)

Edit:
Here's the block-out sneak peek for the next rocket:


It's sitting at just over 800 triangles which isn't too bad considering all of the small details on this one, we'll see how it turns out once I start in on the uv's and texture.


14 December 2014

Raining Doom Upon Our Doomed Enemies!

It's been a while, but with me spending my work days in Presagis Creator I hardly feel like working in low poly 3d in Maya when I come home. So between working on the car, house chores, and simply trying to relax, I've been sneaking a few hours here and there on sunday mornings having fun with my rocket punk themed game I've been dreaming about for some time.

Since the point of a new post is to show new work, I present to you Remote Rocket .. or RC Rocket .. still not sure.


The point of the rocket is to be much larger than the others and to only be able to carry one at a time, once fired the players camera will ideally follow the rocket as the player will be able to control the rocket to remotely rain down some doom upon his doomed enemies. Once fired the wings and extra thruster will extend from the main housing allowing for extra control and distance while still keeping a large area of the main housing for explosives. The metal loops on the top are where the rocket would be held under the vehicle just before it was launched .. I want this item to be so big other players can see it and try to attack the player before it can be launched.

The next weapon will be a little more electrically themed, the concepts are pretty much nailed down I just have to start blocking it out and seeing how it turns out in the 3d space. But I'm sure it'll be next year before I post that one.

[edit] - I found some time to start blocking out the concept based on my drawings and some random google searches. The body will be similar to the fire/lava rocket in that it's mostly glass, but this one will have a gold/brass colored metal braces along the sides to add some support and rocket punk style. The hardest part I think will be getting the look of the plasma ball in the middle, but that's how you learn right? :)


As always: thanks for looking in on me, and do stay tuned!

15 July 2014

What's In the Box?

The next item for the internship, and thus with permission my blog, is this jewelry box. This item was modeled by one of the other artists, while the uv's and textures were my own creation with a touch of slight retopology.


The theme for this object is an heirloom type of jewelry box that was passed down a few generations, and that may have survived the elements for more than a few years before being recovered. I treated the lid as the focal point of this object, though I doubt in the actual video anyone will ever see it I'm still very proud of the way it turned out.

I used six different wood textures to get the look I wanted in the diffuse texture, while the metal is only two with a lot of help from 3 other textures in the specular channel. The design on the lid was partially designed with the character's name in mind as well as something simple and elegant. The text is Lucida Calligraphy font faded out with grunge brushes to look like faded paint. The same fade was used on the wavy lines on the sides of the box with the faded red coloring to add a bit of breakup without being too distracting from the lid.

Possibly more to come, stay tuned!


[Edited 10sep2014 to show the textures and wireframe]

01 September 2013

Breaking the Ice

I realized just today that I hadn't posted this yet, I had "finished" it this past week after several critiques and wanted to show it off. So here it is: the ice rocket! Just in case you didn't know what you were firing I added a label, though that's really just for show in a menu or something. I doubt it will be visible within game-play.


This entry will make five items now that are modeled and textured with at least a diffuse[not counting the shield, I want to go back over that again].

[click the links below to view the related post]
low tech: turret
low tech: light plane  [scroll to the bottom]

high tech: turret
high tech: light plane

I just received a list of work for my internship, so I'll be heading back into the depths of that for a while. Hopefully I'll soon be able to show some of what we've been doing at L7, I hate that my blog has empty spots in it during the months I'm on the project.
At any rate, stay tuned and I'll keep you posted as to what I'm up to!

14 August 2013

Do You ... Rocketpunk?

This month was filled with concepting and building the red team's rocket turret, to clarify I don't have a lot of time outside of my day job, but what I do spend is my afternoons after work. This is what I came up with:


I started with my sketch that I had done while at my day job, and then I would come home and block it out in maya and began to play with texture patterns that might look good for that shape and theme.

The red team is going to be the "low tech" team, so I wanted this to feel like re-purposed technology muscled together for something new. In this case: the rocket turret! So the cog will turn as powered by the boxes on either side of it, when it stops with a rocket facing upwards in the holster the rocket will fire to defend the base. So the metal plates are old and rusty, and have all been riveted together simply to .. work.

Just last night, while looking up reference, I noticed the genre my game objects seem to be finding themselves is rocketpunk. Who knew? Moving forward I'll be taking advantage of this.

Next I'll start on the rockets I've been concepting, stay tuned and I'll keep you posted!

15 July 2013

Self Defense


Finally was able to make a large turn-in for my internship, and though I've been working extra hours at my day job I've managed to find time to return to my "weekend project". Here's my current status of the texture on the previously created geometry and uv's.


In keeping with the blue team's theme of sleek and modern/futuristic tech, this rocket turret can quickly fire rockets to defend the blue team's bases from red team's attacks. There's a small power cable in the back not captured in this render. I feel that the poly count isn't too bad for a rounded object, and the lower cost of the blue team's vehicles might make up for the higher cost of their equipment.
Next I'll start on the low tech turret.


Stay tuned and I'll keep you posted!

31 May 2012

HFIL - Texture Time 2

This month went by quickly with the flurry of work at different security sites and game art taking up my free time. Career status is still on hold, but I managed to get a couple of [negative]replies .. so at least someone out there is seeing my applications. As of today, I have 296 applications out since graduation last year. On a side note I saved up and spent my entire 2 weeks' pay check on Photoshop CS6 pro-license so I'm having fun trying to learn the new stuff in it.[and I can finally try to sell some stuff on turbosquid] Enough of all that, on to the work!

To start where I left off last month, here's the light post:


Then I made a repeating concrete texture for the fountain, using the colors I had used while making the base pillar for the lamp post. In hindsight it might have been better to just use this material for the base pole as well, but I guess that's what happens when you can't just sit down and focus on your environments as a whole. :)

The water texture was something I wasn't sure how to tackle, but since the ESF crew seemed determined to make it look as real as possible with hand painted textures I knew this had to be my goal. I ended up finding an old tutorial from another blogspot user: James. Though because of the age of the tutorial I've noticed some of the images/info seems to be missing. Below this image I'll outline the steps used just in case his tutorial dies.

Step 1: Create a blank canvas, I used 512x512px
Step 2: Choose your highlight and shadow colors as your 2 colors for your brush pallet.
Step 3: goto: filter - render - clouds
Step 4: goto: filter - distort - ripple [setting: 999, large]
Step 5: goto: filter - distort - ripple [setting: 999, medium]
Step 6: paint out your alpha channel as necessary for realism.
Some tips that helped me was to use as big a cloud as possible when using the cloud filter, and for the bloody water I used a dark red and a white/almost red color.


The metal was pretty simple, I wanted it to be black paint with a lot of simple scratches that would be highly repeatable. So I went with a smaller texture and went through lightly applying some of my grunge brushes. I think it turned out pretty decent.

I needed a repeatable wood texture for the benches and the park sign, so I used a technique I picked up while at full sail. I used the fibers filter [filter - render - fibers. settings: 16, 4], and some bevel/emboss while tracing the fibers at a low opacity and a dark brush. Going back to add some cracks in the wood and then playing with the highlights go a long way.

Then I took that texture and added some basic text for the park signage, I ended up liking the way the "bulkyRefuse Type" turned out, though I tried to add some small cracks and a slight bevel/emboss to the letters.

Here's how they turned out in the scene in maya, later on I worked on making normal and specular maps using photoshop and crazybump, and then moving all my files over to 3ds max so that I could work alongside the methods of the ESF crew.


Lastly I came up with a theme for the sky dome, but after I finished it and showed it off to the ESF crew they promptly informed me of the dynamic sky technology they have for their game engine .. and that my texture wasn't necessary. So .. oh well .. here it is anyways :p


I was able to play with the slate material editor in max as well as trying to figure out how max handles two materials on the same mesh. Not a big fan of the extra steps, but in the end I was able to get the same results maya gave me. I'm really glad this is all coming together as I have a few "weekend" personal projects just begging for me to get to them. Speaking of work though .. I need to head to my "day job".
Stay tuned!